There are two parts to the process:
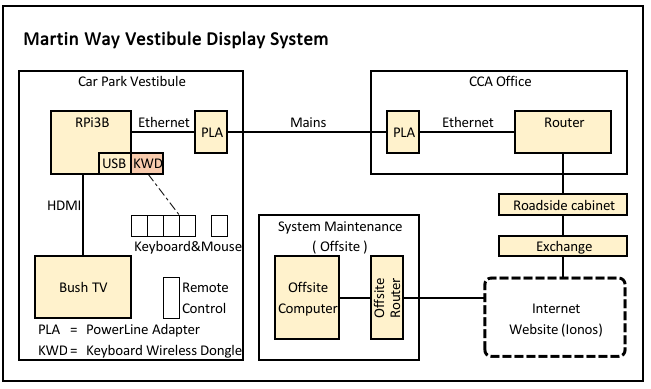
The kiosk style display system is run on a Raspberry Pi 3B (RPi3B) single-board-computer (SBC) under the Linux operating system. It streams a movie from the Martin Way website to the TV located in the car park vestibule. The movie is created by PowerPoint from a series of slides maintained weekly to keep up with events. The block diagram below shows a schematic of the system and the components involved.
There are two parts to the process:
The core of the display comprises a series of PowerPoint slides saved as a .pptx file which is downloaded from the kiosk folder on the MWMC website at Ionos to the maintainer’s local computer, changed, saved and then exported as a .mp4 movie. Because this generates a large file, it is then converted to a .webm file via FreeConvert (https://www.freeconvert.com/mp4-to-webm) on the Internet and downloaded to the local computer. The revised .pptx, .mp4 and the .webm files are then uploaded back to the kiosk folder on our website. It is the .webm file which is picked up by the RPi3B and sent to the TV in the car park vestibule.
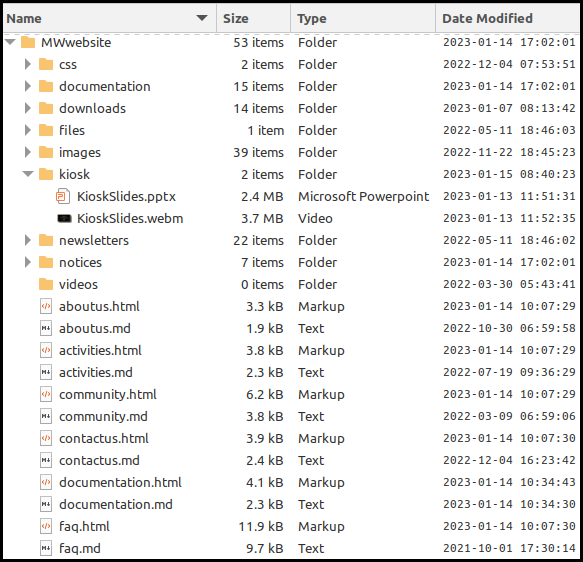
The file structure of the folders and files on the website is as follows (not all are shown):
Download the latest KioskSlides.pptx file from the kiosk folder on the Martin Way website to a local folder using a FTP (File Transfer Protocol) app (see Note 5 for parameters).
Initial settings (one off)
Update slides in PowerPoint
When completed export the presentation as a mp4 movie
The mp4 file is a large file so convert it to a much smaller, web friendly format - webm.
This is achieved by uploading the mp4 file to the conversion site at https://www.freeconvert.com/mp4-to-webm as follows:
The mp4 file is then uploaded and converted to webm. This takes a few minutes. When complete, the “Download” box is hightlighted so click on it and then “Save to device” The webm file is downloaded to the Download folder on the local computer from where it can be copied to the Kiosk folder where the rest of the website files are stored.
Upload the movie and slideshow files, created above, to the kiosk folder on the website at martinway.org.uk using a FTP (File Transfer Protocol) app such as FileZilla Client (https://filezilla-project.org/)
Files are downloaded and uploaded from and to the website by an app designed for the purpose such as FileZilla for which the parameters are as follows (SFTP = Secure File Transfer Protocol):
| Parameter | Value |
|---|---|
| SFTP server | home84395176.1and1-data.host |
| Port | 22 |
| Username | u35046426-martinway |
| Password | kaphid6d6 |
| Remote Directory | \ |
| Local directory | The folder where you keep your files |
The processes involved, listed below, are necessarily technical but are detailed in the following sections. The login for the RPi3B, should it be needed, is Pi / K@phid6d6, although it is set up to login automatically.
1 Install Unclutter and 2 CEC utilities 3 Scan for TV address 4 Set up Autostart 5 Set up run schedule 6 Set up Chromium-browser 7 Write html code for playing the movie
All these steps, apart from (6) and (7) are run at the command line in Terminal.
sudo apt install unclutter
sudo apt update
sudo apt upgrade
sudo apt install cec-utils
echo ‘scan’ | cec-client -s -d 1
sudo nano ~/.config/lxsession/LXDE-pi/autostart
@lxpanel --profile LXDE-pi
@pcmanfm --desktop --profile LXDE-pi
@xset s off
@xset -dpms
@xset s noblank
@chromium-browser --start-fullscreen --start-maximized --noerrdialogs --hide-scrollbars --kiosk https://martinway.org.uk/kioskMovie.htmlCrontab -e
… for a TV
25 09  *  *  * echo 'on 0.0.0.0' | cec-client -s -d 1
30 09  *  *  * sudo reboot
00 21  *  *  * sudo killall chromium-browser
05 21  *  *  * echo 'standby 0.0.0.0 | cec-client -s -d 1
… for a monitor
Replace the two echo lines above with the respective lines below
25 09  *  *  * DISPLAY=:0 xset dpms force on
05 21 * * * DISPLAY=:0 xset dpms force offThis code, kioskMovie.html, resides in the main website folder and caters for movies with the webm extension. If any other extension is required then the code will need to be downloaded from, edited by adding a new “source” line and returned to the website.
<!DOCTYPE html>
<html lang="en">
 <head>
  <meta charset="UTF-8">
  <meta name="Generator" content="EditPlus®">
  <meta name="Author" content="">
  <meta name="Keywords" content="">
  <meta name="Description" content="">
  <meta name="viewport" content="width=device-width, initial-scale=1">
  <title>Video Playtime</title>
<style>
* {
  box-sizing: border-box;
}

#myVideo {
  position: fixed;
  right: 0;
  bottom: 0;
  min-width: 100%;
  min-height: 100%;
}
 </style>
 </head>
 <body>
   <video autoplay loop muted id="myVideo">
   <source src="kiosk/KioskSlides.webm" type="video/webm">
Your browser does not support the video tag.
</video>
 </body>
</html>